Upgrade Installation Instructions
Welcome
Thank you for selecting a Capital Software application. Please read this entire installation instruction sheet to ensure a satisfactory installation.
Contact Information
If you experience any problems during the installation process, you should email your question to support@capsoft.ws. Email submissions will be answered in the order they are received.
Location of Installation
This program is to be installed on the computer that houses the old program. If you are working on a network environment then this needs to be done from the server. If you are working on a standalone computer, this installation needs to be done on that computer.
Standard Installation Process
1. Receive Download site or CD
2. Print installation instructions (pdf)
3. Install version
4. Upgrade from existing Capital Program(s).
Note – The new 32 bit application you are upgrading to must be completely installed.
Step by Step Install Instructions
1. Download or insert CD into computer.
Click START / RUN.
2. Type d:\setup.exe and push OK. Replace d with whatever your CD Rom drive letter is.
When the screen launches, click YES to continue Upgrade install.
When the Welcome screen appears, click NEXT.
2a. If the setup.exe is downloaded locate the setup.exe and double click it.
When the screen launches, click YES to continue Upgrade install.When the Welcome screen appears, click NEXT.
3. Click NEXT for the default directory (UPGRADE) and NEXT for the application name. Click INSTALL and wait for progress bar.
4. Double click on shortcut.
5. Choose the type of system you are upgrading from, 16 bit or 32.
6. Then choose the program you are upgrading. Then click NEXT.
7. Click the choose directory.
8. A windows browser will appear. Choose the capital program file folder. Click OK, the Click NEXT.
9. Click Upgrade.
It will say at the bottom Process Finished. Click the close (X) in the top right corner.
Congratulations, you have upgraded your software with your existing history from your old program.
Showing posts with label Instructions. Show all posts
Showing posts with label Instructions. Show all posts
Wednesday, February 3, 2010
Tuesday, December 29, 2009
How to Setup a Billing Grid within CSI Utility Billing and Revenue Management Software.
1. Apply a cycle name such as Month.
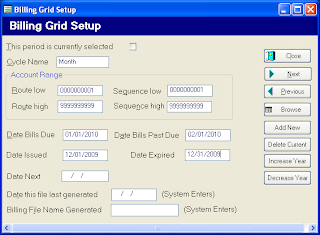
2. Account Range should be as follows (to include all your accounts):
RL – 0000000001 RH – 9999999999
SL – 0000000001 SH – 9999999999
3. Bills Due – Enter the Due Date
4. Past Due – Enter the Date you want Penalties Applied. You must enter a Past Due Date.
5. Date Next Reading is the next time you want to apply this charge to the accounts. This is optional
6. You can define as many cycles as desired. Cycles only need to be setup one time. Next year when you want to update the year for each of your cycles, CLICK the INCREASE YEAR BUTTON. That will save time.
Note: If you are unsure as to which grid to increase year, or are finding that the billing file is not pulling the correct date, we suggest creating new grids each year to alleviate any confusion (i.e. not using the increase year button.)
Note: Defining cycles require thought and most of which is completed during training.
After all the CYCLES are defined you are ready to gather readings and bill.
Note: The cycle name entered must be exactly the same as the cycle on the services entered. When a computer searches it is looking for exact matches. (Month, month or Monthly is not the same to a computer. The difference in upper and lower case M’s and suffix makes these cycles different.)
Creating Billing Grid for CSI Utility Billing Software
Apply a cycle name such as Month.
Account Range should be as follows (to include all your accounts):
RL – 0000000001 RH – 9999999999
SL – 0000000001 SH – 9999999999
Bills Due – Enter the Due Date
Past Due – Enter the Date you want Penalties Applied. You must enter a Past Due Date.
Date Next Reading is the next time you want to apply this charge to the accounts. This is optional
You can define as many cycles as desired. Cycles only need to be setup one time. Next year when you want to update the year for each of your cycles, CLICK the INCREASE YEAR BUTTON. That will save time.
Note: If you are unsure as to which grid to increase year, or are finding that the billing file is not pulling the correct date, we suggest creating new grids each year to alleviate any confusion (i.e. not using the increase year button.)
Note: Defining cycles require thought and most of which is completed during training.
After all the CYCLES are defined you are ready to gather readings and bill.
Note: The cycle name entered must be exactly the same as the cycle on the services entered. When a computer searches it is looking for exact matches. (Month, month or Monthly is not the same to a computer. The difference in upper and lower case M’s and suffix makes these cycles different.)
Monday, December 28, 2009
Multiple Payment Reversal Instructions for Captial Software Utility, Property Tax and Revenue Management Softwares.
Multiple Payment Reversal
1. Locate the first account of the multiple payment that needs the payment reversed.
2. On the Payment screen, push the Reverse Payment button.
The reversal screen will be displayed.
3. Select a reason for the reversal and any notes pertaining to this reversal for a good audit trail.
4. If you DO want this reversal to show up on TODAY’s balancing reports leave the check mark (This would be for a reversal performed the same day the payment is taken).
If you DO NOT want this reversal to show up on balancing reports REMOVE the check mark.
5. In the section that displays the line items, highlight ONLY THE MULTIPLE line item. Once the transactions are highlighted, push the REVERSE SELECTED button. Wait until the process is finished.
6. Then exit out of the reverse screen and you will find a new entry on your payments tab. The reverse function will also make the proper gl entries and put the charge back on the Charges screen.
Go to the next account that was part of the multiple payment and repeat steps 2 thru 6.
Note – The entry made for Balancing Reversals has a type of REVPAY. The entry made for a non balancing reversal is XREVPAY. Gl entries are always made but the type determines whether it shows up on the daily balancing reports.
Payment Reversal Instructions for Capital Software Utility, Property Tax and Revenue Management Softwares.
1. Locate the account that needs the payment reversed.
2. On the Payment screen, push the Reverse Payment button.
The screen above will be displayed.
The screen above will be displayed.
3. Select a reason for the reversal and any notes pertaining to this reversal for a good audit trail.
If you DO want this reversal to show up on TODAY’s balancing reports leave the check mark (This would be for a reversal performed the same day the payment is taken).
If you DO NOT want this reversal to show up on balancing reports REMOVE the check mark.
If you DO want this reversal to show up on TODAY’s balancing reports leave the check mark (This would be for a reversal performed the same day the payment is taken).
If you DO NOT want this reversal to show up on balancing reports REMOVE the check mark.
4. In the section that displays the line items, highlight only the payment line item that is part of the transaction. Once the transactions are highlighted, push the REVERSE SELECTED button. Wait until the process is finished.
5. Then exit out of the reverse screen and you will find a new entry on your payments tab. The reverse function will also make the proper gl entries and put the charge back on the Charges screen.
Note – The entry made for Balancing Reversals has a type of REVPAY. The entry made for a non balancing reversal is XREVPAY. Gl entries are always made but the type determines whether it shows up on the daily balancing reports.
Single Payment Reversal Instructions for Capital Software Utility, Property Tax and Revenue Management Softwares.
1. Locate the account that needs the payment reversed.
2. On the Payment screen, push the Reverse Payment button.
The screen above will be displayed.
3. Select a reason for the reversal and any notes pertaining to this reversal for a good audit trail.
If you DO want this reversal to show up on TODAY’s balancing reports leave the check mark (This would be for a reversal performed the same day the payment is taken).
If you DO NOT want this reversal to show up on balancing reports REMOVE the check mark.
4. In the section that displays the line items, highlight only the payment line item that is part of the transaction. Once the transactions are highlighted, push the REVERSE SELECTED button. Wait until the process is finished. Then exit out of the reverse screen and you will find a new entry on your payments tab. The reverse function will also make the proper gl entries and put the charge back on the Charges screen.
Note – The entry made for Balancing Reversals has a type of REVPAY. The entry made for a non balancing reversal is XREVPAY. Gl entries are always made but the type determines whether it shows up on the daily balancing reports.
Subscribe to:
Posts (Atom)